Once the beeswax has set and is not very tacky, you can add buttons or hand-sew them into small pouches....
ARTSY CRAFTS
Procedure
1. Cut the fabric - preheat the oven to the lowest setting. Cut the fabric into sizes that will fit on your baking sheet.
2. Place on a baking tray - line a baking sheet with parchment paper and place the fabric on top.
3. Sprinkle the pellets - evenly distribute a liberal amount of beeswax pellets all over the fabric. Make sure you get pellets near the edges too.
4. Melt and spread the beeswax - place the sheet in the oven for about 4-8 minutes. When the pellets melt completely, take the tray out and use a paintbrush to spread the wax evenly over the entire fabric. The beeswax will stick to the brush, so use one you’re okay discarding or saving to make future beeswax wraps.
5. Let dry - using tongs, remove the fabric from the baking sheet. It should feel cool to the touch after waving it for a few seconds in the air. Hang the fabric up to dry or set it on the back of a chair with the beeswax side facing up.
Once the beeswax has set and is not very tacky, you can add buttons or hand-sew them into small pouches.
Taking care of beeswax wraps
Wash your wraps by hand in cool water with a mild dish soap. Place them on a drying rack or clothesline to dry. Avoid any heat such as hot water, microwaves, or ovens that will cause the beeswax can melt, ruining your wraps.
Material
Procedure
1. Make your glitter mix. Use different colours, shapes and sizes. Don’t want anything too big (it won’t fit inside the tumbler).
2. Unscrew the bottom of the tumbler and remove the papers from inside. Sprinkle or spoon in the glitter mixture.
3. Fill the compartment with water, as full as you’d like. Tightly screw the bottom back on!
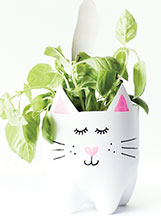
Material
Procedure
1. Remove the label from your bottle, scraping off all the sticky residue.
2. Draw an animal shape on the bottle with a dry erase marker.
3. Use a box cutter to poke a slit in the bottle, then cut out the animal with scissors. Optional: Use the box cutter to create small drainage holes on the bottom of the bottle.
4. Wipe off the dry erase marker.
5. Coat the bottle with acrylic paint, then let dry.
6. Create your animal’s face with paint pens and permanent marker.
7. Let your completed bottle planter dry completely.
8. Pot your plant with quality potting soil.