Here are three simple card ideas you can try, using easy to find materials and techniques that are in the reach of anybody....
QUICK CRAFTS
It’s almost Eid, and what better way to show your loved ones you’re thinking of them than with a handmade card? Here are three simple card ideas you can try, using easy to find materials and techniques that are in the reach of anybody. Just make sure that you give them to people that appreciate your hard work!
All of these cards are A6 size. That means you can get two cards from one regular A4 piece of card. Just cut it across the middle and then fold each card in half. Or you can buy readymade card bases, often called card blanks.
When I am making cards, I like to do my decorating on a separate piece of card, called a card front. That’s just because if I make a mistake I’ve not wasted as much card. A card front measures 10.5 by 14.7cm, or one quarter of an A4 piece of card.
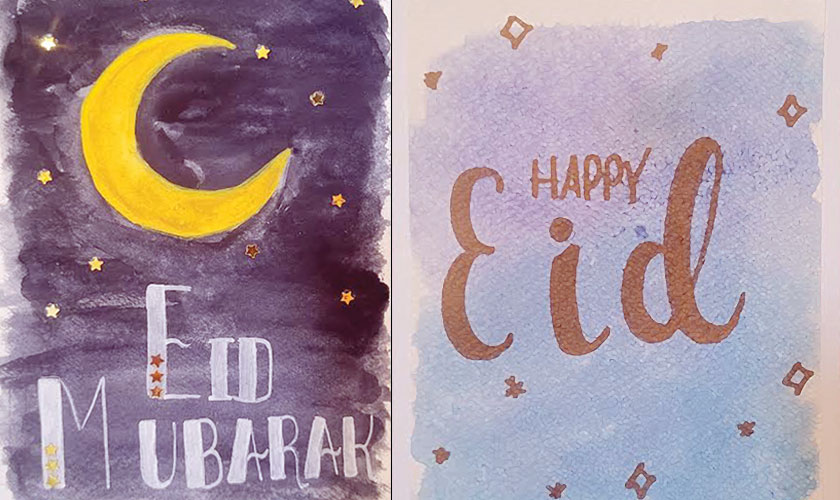
This card is really simple, but it is also open to lots of variety. I painted a watercolour background and then wrote a greeting with a gold pen. See below for suggestions on how you could change this.
Materials
* Watercolour paper
* Watercolour paints
* Paint brush
* Lead pencil
* Gold pen (I used a gold paint pen)
* Card base
* Double-sided tape or strong glue
Method
1. Cut the watercolour paper to either the same size as the card or a bit smaller. If it’s a bit smaller you get a nice border around the edge.
2. Cover the paper with clean water, then add some watercolour paint, letting the colour spread into the area you have wet. This is called a ‘wet on wet’ technique. You can use the paint brush to spread the colour around. You might want to add another colour as well, or just leave it with one colour. I used two colours, a purple blue up the top and a more teal blue down the bottom. Then I just sort of swirled them together a bit.
3. Let the paints dry (or heat them up with a hair dryer if you’re impatient, like I am). If you’re worried about them not being flat after you’ve dried them, stick them under a heavy book for a while, or just use lots of double-sided tape when you attach the card front to the card base.
4. When it’s dry, write your message in pencil. If you’re worried about your handwriting, try looking up fonts on your computer, or websites like dafont.com. Type in your message, pick a font you like, and copy the way it is written. Sketch it out and trace over it with your gold pen. It doesn’t have to be perfect – this is handmade after all. Just take your time and be proud of yourself.
5. Draw sparkles around the message to add some pretty design as well as distract from any errors you might have made.
6. Stick your picture on to the card with double-sided tape or glue.
This card builds on the last one, with a couple of extra steps. You don’t have to use paint to make this card. You could colour it with anything: pencils, markers, acrylics… you could even make a collage with shapes cut out from your favourite newspaper or magazine!
Materials
* Watercolour paper
* Watercolour paints
* Paint brush
* Lead pencil
* White pen (I used a white paint pen)
* Gold confetti
* Compass or something round to draw around
* Card base
* Double-sided tape or strong glue
Method
1. Draw the moon. It might be easier to use a compass to do this, but I drew around a pot on my desk. It just goes to show you can make do with what you have.
2. Paint the moon. Since I used watercolour paints, I had to do this first. If I was using acrylics, or had chosen a different background colour, I might have been able to do the background first, but with watercolours you really need to go from lightest to darkest.
3. Write the greeting. When the painting was dry, I sketched on my writing with my pencil and, because of the style of writing, I used a ruler as well. Again, I used a paint pen, but you could use acrylic paints or a gel pen if you can’t find one of them, or you could even use stickers or cut out letters.
4. Finally, I added gold star confetti. A good hint with the confetti: add dots of glue where you want the stars to go, and then put down the stars. This is much easier than trying to put glue on those tiny little stars.
5. Add the card front to the card, add your message inside, and hand over your card (if you can bare to part with it).
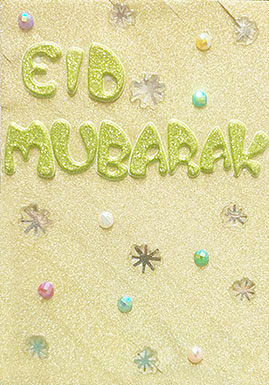
If you don’t feel like painting or drawing anything, try this card. It uses glitter tape, and any sparkly stickers you might have lying around. Plus, if you’ve made mistakes on an earlier card, you can cover them up with the glitter tape and not waste the card. Just make sure that your stickers still stick. Some of my things were a bit old and needed some additional glue to help them stay down.
Materials
* Alphabet stickers
* Glitter tape
* Gem stickers
* Card front (this can be a scrap card, since it will be covered up)
* Card base
* Glue
* Double-sided tape
Method
1. Cover the card front with glitter tape. When you add tape, start in one of the corners and move diagonally. This is actually easier than trying to stay straight horizontally or vertically. I used one colour, but you might want to try and make a pattern.
2. Add your sentiment. Find your sparkliest alphabet stickers and write out your message. Again, if you don’t have them, you could always use letters you’ve cut out from somewhere. Or try painting the letters with clear glue and sprinkling them with glitter; then they will be super shiny.
3. Decorate. Add any other gems, flowers, or other shiny stickers you might have. This is a chance for you to really personalise your card.
4. Attach the card to the base and be proud of your creation.
If you make any of these designs, or are inspired to create designs of your own, do share your pictures with us on Instagram (@UsMagTheNews).
Happy Eid!